

Standard klient til trådløst netværk i Windows XP
Denne guide forudsætter at du bruger den indbyggede klient til trådløse netværk. Det gør langt de fleste. Hvis vinduene på billederne nedenfor ikke ser ud som på din PC, prøv da de andre guides længere nede på denne side.
Find det lille computer icon i bundlinien og dobbelt klik.

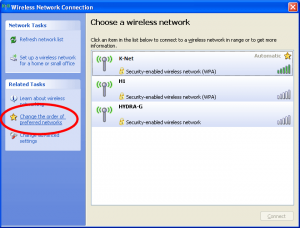
Derpå åbnes et vindue, engelsk titel: Wireless Network Connection
Tryk på linket ud for stjernen i menuen til venstre.
Et nyt vindue åbnes, engelsk titel: Wireless Network Connection Properties.
Tryk på knappen Tilføj/Add.

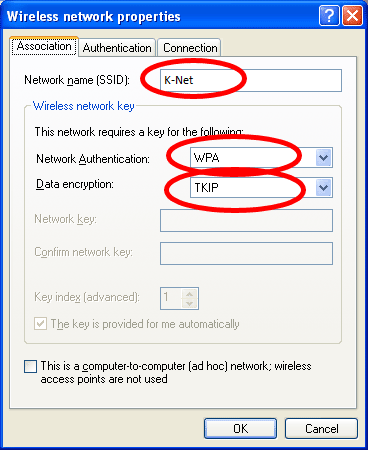
Endnu et vindue åbnes, engelsk titel: Wireless network properties.
Sæt indstillingerne som vist på billedet neden for.
Skift videre til næste faneblad, engelsk titel: Authentication.
Sæt indstillingerne som vist på billedet neden for.

Tryk derefter på Egenskaber/Properties og et nyt vindue åbnes.
Sæt hak i feltet markeret på billedet nedenfor.

Et nyt vindues åbnes.
Fjern hakket og tryk ok.

Klik herefter OK i alle åbne vinduer.
Undgå dog at trykke Tilslut i det først vindue.
Derefter skulle denne ballon dukke op fra din bundlinie.
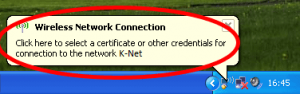
Klik på ballonen og et nyt vindue åbnes.

Udfyld vinduet som ovenfor med dit brugernavn & password.
Undgå at udfylde feltet Logon domain.
Klik OK.
Skulle der herefter være problemer kontakt os da pr. mail eller i kontortiden.
Built-in client for wireless network in Windows XP
This guide is intended for the existing client for wireless network. Which most users does. If the windows below does not look like on your PC, try to take a look at the guide further down on this page.
Look for the small computer icon at the task bar and double click.
A new window opens, called Wireless Network Connection
Click on the link next to the icon of a star in the menu on the left.
A new window opens, called Wireless Network Connection Properties.
Click the Add button.
Another window opens, called Wireless network properties.
Set the properties as shown in the picture below.
Change the tab to the next on called Authentication.
Set the properties as shown in the picture below.
Click then on Properties and a new window opens.
Set a mark in the field shown in the picture below.
A new window opens.
Remove the mark shown in the picture below.
Click then on OK in all open windows one by one.
Avoid clicking Connect in the first window.
The balloon shown below should pop up from the taskbar.
Click on the balloon and a new window pops up.
Fill out the window shown above with your username and password.
Leave the field Domain blank.
Then this balloon should shown from your taskbar.

Click on the balloon and a new window pops up.

Click OK.
Should there by now still be any problems you are welcome to contact us in our office hours or via mail.